Search This Blog

Monday, June 4, 2012

Money Savers

Coupons Coupons Coupons.
taken from the Hobby Lobby Website please print coupon from their website
I love to be the one that is pulling out coupons when we go out to eat.  I keep coupon books in my diaper bag, I check the internet before I buy something in the store, and I scan clearance racks before I buy anything at my favorite stores.

One of the biggest savers is breaking down and signing up for emails from your favorite stores.   Most of the places I shop will even take discounts from my phone!! Here are a few stores that are awesome and will send you major discounts!

Old Navy: I get emails from them for their 20% discounts.  Great for baby clothes! I just go in bust down the clearance rack and then get an ADDITIONAL 20%.  Yeah, I get clothes for $2.00 sometimes from there that are adorable. oldnavy.com to sign up.

Kohls: I love to spend an afternoon at Kohls with my mom and they will send you email discounts just show them the email at checkout! kohls.com to sign up.

American Eagle:  This one isn't an email but a text message.  Every friday I can count on my phone going off with a great discount! sign up at ae.com.

Joann's: Once more a text message you can sign up online to get text messages.  They also have a sign inside their store that you can text to get a discount.  I love my weekend discounts from Joann's probably a little too much!

Michaels: They will send you an email and text messages!! But they only take one coupon at a time.  You can also just go to their website and print coupons.  Michaels.com.

Hobby Lobby: They provide a weekly 40% off coupon on their website! hobbylobby.com

The biggest money saver I do as well is price matching at Walmart you can take in you weekly ads or I go online to freshmarket.com and smiths.com pick out what I usually buy and Walmart will price match for me.  I don't have to drive around and I can get the best prices.


Go out there and look for your neighborhood's coupon books too.  If you can get something like Hometown Values. Hometownvalues.net.  At you house you can save on everything! I highly recommend it!  Anyway just a few ideas.


Have a great day!

Wednesday, May 16, 2012

Cotton Body Suite

I saw this fabric and had to make something for Riley :) So here is how I made this super cute little cotton body suite!!
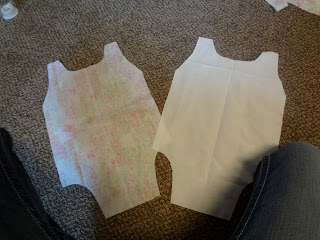
I started out by grabbing one of Riley's body suites and laid it out on the fabric cutting it out bigger. Make sure to make the leg holes huge!! Because they need to be gathered up when it is sewn together.

I then cut out an identical one and made the crotch area skinnier and the neck hole bigger on the front.  I then set the two pieces on top of my liner fabric; and cut out the same pieces.
I then put the right side and the liner together and sewed them together making the seam on the inside. After I sewed the two together I left a few inches to turn it right side out. But, before you turn it make sure you clip all of the curves so that it lays flat.
 Make sure you don't cut your stitches though, that just makes a mess in the end!! After it is flipped right side out I ironed it really well and brought out all of my curves and tough corners.  Here is the trickier part. Elastic, I measured Riley's thighs and she had 9 1/2" circumference, So I cut my 1/4" elastic to be 4 1/4" length on each side of the legs so together they will equal her 9 1/2". Pull the elastic all of the way across the leg holes you have and put a stitch all the way down while pulled.  When you release it will be super cute and gathered.

After the legs are done on four sides I stitched the sides together up to the arm holes. I wanted to make little sleeves; so I cut out a strip of fabric about 9"x3" and stitched 3" elastic down it to make it really gathered and cute.

I tucked it under the little sleeve and stitched it around the arm holes. I wanted her head to fit easily through the head hole so I put another elastic gather on the front so it would stretch over her head.
The last step I just put snaps together on the bottom like a normal body suite. Boda Bing Boda Boom.  I had a super cute body suite!!


Thursday, May 10, 2012

Chicken Enchilada Bean Dip

So in college I picked up this great recipe for a Chicken Enchilada dip.  I think we would make it at least once a week and down a whole bag of chips with it.  I like to eat it for dinner especially if it is a night where there is a great movie or show to watch.  This last time I made it I decided to throw a little twist to it and added beans.


Here is how to make it.

2 C. Cheddar Cheese
1 can Cream of Chicken Soup
1 C. Milk
1 C. Sour Cream
1 can Green Chilies
1 can Enchilada sauce
8 Corn Tortillas
1 can Refried Beans
2 Chicken Breasts

1 bag of Tortilla Chips


First, I chop up my chicken into tiny pieces, you could also shred it.  Then I boil it, I find that boiling the chicken keeps it nice and moist.  I usually let it boil for about 15 mins if it is already chopped up.  Just make sure it is cooked all the way through.  Next in a sauce pan I put together 1 cup of the cheddar cheese, the cream of chicken soup, milk, sour cream, enchilada sauce, and chilies.  I let this simmer for a bit and get all mixed together.  Once the chicken is cooked I drain it and add it to the mixture in the sauce pan.  Mean while I take the can of refried beans and cover the entire bottom of a 9x9 pan with the can. Then I take half of my tortillas and rip them into 2x2 pieces.  I cover the beans with the tortilla strips then pour half of my sauce over the top.  then I take the rest of the tortillas rip them up into small pieces and coat the top of the sauce and pour the rest of over that layer.  I like the take the last cup of cheese and cover the whole shebang with it. Throw the pan in the oven for 30 mins. Then pop open a bag of your favorite tortilla chips and you have a killer dip dinner :)

Thursday, May 3, 2012

Patchwork Skirt


Here in Logan there is this great bead store called Beatles and Beads.  They have this fun little boutique section.  It was there about two years ago that I saw this adorable patch work  baby skirt.  I could believe it when I saw that it was $25 bucks though.  So, I took a mental picture of the skirt and saved some cute fabric scraps to make the skirt in the future. Luckily, I made a great car seat cover and had a bunch of left over fabric.   

To start off I cut my fabric scraps into six 4"x5" strips of each color that I was using.  (I only used two colors). Then I cut a 4"x2" of each color.


Then I laid them out like so and pinned the right sides together. 

After I sewed them together I found a scrap piece of fabric to use as a lining.  I just set this on top of the lining and cut around it. I wanted a border piece on the bottom so I just measured out how long I needed it and made it 3" wide. 
with the bottom border This is what is what I had.  This is only half of the skirt, I made it in two sections that I stitched together. 
Here is what the back looks like with the lining piece stitched in. Next I went along the top seam and pinned in my elastic.  and did a loose stitch by hand beneath it.  taking the stitch I tried my best to make a even gathering pattern. Then restitched it together with my sewing machine.
So to finish it off I stitched both of my half skirts and this is what I ended up with :)
After I made the skirt I realized that it was a little short so I thought it would be really cute to make a diaper cover out of the same material.  I grabbed a diaper cover and traced it onto what fabric I had left. Leaving enough space for seams and elastic. I didn't take any pictures of how to make the diaper cover so I'll have to make another one for a different post. Here is what it turned out like. 
Sorry about the bum shots but it was the best way to show the diaper cover :)

Happy Crafting!

Tuesday, May 1, 2012

The not so Scrapy Scrap Baby Blanket


I have a bunch of fabric scraps and decided it was time to put them together to finish Riley's Crib bedding.   Here is what I had to start with.

  I had a large piece of my foe fur white fabric along with a few scrap pieces.  Then I had two pieces of pink rosette fabric.  I also had a bag of about 4 yds of lace that I was going to use on a different pattern and decided not to. 
*WARNING if you work with the fabrics I chose you will get very messy but it is worth it!!!*

I wanted to use as much of the fabric as I could, so I played with it in as many different ways as I could think of.  Deciding that having the entire back be white and the other side have a white middle with a pink border would use the most fabric.  Then border the entire blanket with my thick white lace. 
So here it is with the pieces put together.  I wanted the blanket to be as large as I could make it.  I love to be able to Wrap Riley all the way up in her blankets. So with it laying out it is 35"x36".   I had to make the middle piece with Three scrap pieces of the white foe fur.  Luckily, because it is shaggy it is easy to hide the seams.   I stitched them all together.  Making sure to put right sides together.
Make sure to pin everything together really well before you sew it together.  Both of these fabrics are silky and stretchy (great combination :) ) So keeping them pinned well keeps the sliding and the stretching to a minimum.  I went through and pinned the entire front of the blanket together then started to push it through my machine.
Once I had the front put together I added the lace around the outside.  I pinned it to the front about 1/4" of the way in. On the corners I gathered it a little bit to make the turn nice and smooth around the edges.
The next part became a little tricky.  I needed to add the back without losing the lace.  So putting right sides together.  I carefully tucked the lace inside and pinned  it down.  I was worried it would get caught in my seams.  I sewed all the way around the blanket except for the last 4".  I then turned it right side out. 
Here is where I left the seam open.
The next part I did by hand.  Simply stitch the remaining hole closed and lay the blanket out flat.  In the corners where the white meets the pink I put a few stitches to hold the blanket together. 
Make sure you wash your blankets before you let your baby have the blanket. :) Especially with how many loose fibers get stuck to this blanket I didn't want her to have to worry about eating those fibers or breathing them in.

Here she is sleeping with my finished project!!! I think her bedding is finally finished.. At least until I decide to make something else :)
Happy Crafting!!!

One more picture of cute Riley :)
 

Friday, April 27, 2012

The Best Wheat Bread

My husband bought me a bread machine for Christmas.  Unfortunately, the first loaf bread I made was immediately thrown in the trash.  Along with my second, third, fourth, until finally I ran into this recipe.  It was a huge hit! It is light, fluffy, and beyond yummy! I hope you enjoy it as much as I do!!  You can make it with wheat flour or white flour.  Warning if you make it with white flour it will turn out huge! You might want to split it into two loafs. 

1 1/2 C. Warm water
4 Heaping cups of wheat flour
1/4 C. Honey
2 Tbsp Sugar
1/2  tsp Salt
2 Tbsp Olive Oil
2 1/4 tsp Fast rising yeast

My bread machine instructs me to add the water first; then the other ingredients on top of the water.  Making sure that the yeast doesn't touch the water or the salt.  
I put in the water and layered the flour over the top
After I added all of the ingredients the yeast is safe in the middle of the flour  andthe salt is in the top right corner
I then set my bread machine to the dough setting. It takes about an hour and half with my machine. 
This is what your dough should look like when it is first mixed.

This is what the dough will look like when the machine is done :)  I don't cook my bread in the machine I take it out and knead it by hand one last time.  (If you wanted to cook it in your machine it would be just fine but I think it turns out better in the oven)

I usually take my time kneading the bread to get all of the air pockets out of the bread.  I then grease a bread pan and let it rise covered for 40 minutes. 


The last ten minutes of rising I start my oven preheating to 350 degrees F. It will then go straight in and bake for 28-30 minutes.  I like the top crust to be just golden brown and not too crunchy. 

Thursday, April 26, 2012

Strawberry Pie


Today I made my first fruit pie!  I bought a bunch of strawberries and as always my husband and I weren't eating them fast enough.  Therefore, they are now in a pie form so we will gobble them up.  It turned out great! Here is my recipe.

Crust:

Preheat your oven to 400 Degrees

1 C. sifted flour
1/2 Tsp. Salt
1/4 C. Shortening
4 Tbsp. Cold Water
1 egg white (optional)

Sift the flour and salt together.  Add in the shortening cutting it in until it forms crumbs.   I then switch over to my hands to mix for the last step I add the cold water one tbsp at a time until the dough flexible. I then roll it out onto a floured surface until it is a little larger than my pie dish. 

Sorry I didn't start taking pictures until I had it in my dish. I try to cut crust so that it is hanging off of the edges enough to fold  under once. I then used my fingers and pinched a scalloped edge.  Then take a fork and poke little holes to prevent bubbles.  Here is a hint for you to get a glossy finish on your crust brush it with an egg white :)

I then took two pieces of aluminum foil and gently pressed it into the center of the pie. I then filled it with black beans.  This keeps the crust down. I cooked the crust for about 10 minutes on the middle rack with the  beans.  After that I moved the crust to the bottom rack for 6 minutes.  When the crust turns golden brown remove the foil and beans.
My crust turned out like this :)

The Filling: 

1 Quart of strawberries
1 C. sugar
3 Tbsp of cornstarch
3/4 C. water 


I took half of my strawberries fresh strawberries and covered the bottom of my crust.  Because I didn't have a full quart I supplemented my strawberries with some whole frozen strawberries.  I put a cup of the frozen strawberries and the cup of sugar in a small pot on the stove. On medium heat I started to smash the strawberries and mix them together with the sugar.  In small bowl I slowly added the cornstarch to the water once it was well mixed I slowly poured it into the strawberries on the stove. With a whisk I blended it together on a simmer until the mixture became nice and thick. It took about 5 minutes.  


I took my sauce and poured it into my crust. finishing the pie I placed the rest of my fresh strawberries.  Put the pie in the fridge for about 4 hours to let it solidify together.


 Before I served the pie I topped it with whipped cream :)


Believe me it tasted wonderful!!! I loved the Crust <3